Best Lighting for Food Photography: Beginner’s Guide

Whether you are a food blogger, professional food photographer, or even simply a cook, you need to take the images perfectly. And lights play the most important role to give the photo aestheticism and delicacy. Unfortunately, most of the food photos lack the important features of having the perfect light setup. Maybe it’s because of not being properly familiar with the best lighting for food photography.
If you are willing to learn about the most effective tips for food photography light setup, we can help you today. In this content, we will cover up the basic, unique, and effective tips regarding this topic with you. So, keep your eyes attached and learn something essential.
Why Light Setup is Essential for Food Photography
Whenever it is about photography for a professional reason, having a well-decorated setup is mandatory. And lights play a vital role to get the most vibrant and realistic image. Things go just the same way when it is about professional food photography.
You cannot simply cook some delicious food and take a picture of it for advertisement. Remember that foods have taste and smell. And a photo or video cannot expose how it tastes like and how delicious the smell is in any way. So, the only way to make it attractive is to give it a delicious look and at the same time, make the images perfect anyway.
Taking an image of anything is easy but to expose the delicacy of food just through the image is not easy completely. You have to take the images from the right side and the light should match the food environment properly. That’s why the light setup for food photography is a little bit different to make it perfect. And the appropriate food photography light effect can help you in this case.
To say it more specifically, you cannot set the functions anyway when it is food photography. Using flash even when the light setting is okay can be a disaster. Again, you have to choose the perfect side to set the light. And finding the appropriate location to take the image from is also important as well.
Sometimes, natural light looks more vibrant and clean than artificial light. You should learn when to use a dark light setup and when you should go for the white setting. And on everything about light, you need to decide wisely so that you can successfully expose how delicious the food is.
You may also like- Photo Editing Techniques for Pastry Items.
A Guide to Best Lighting for Food Photography
Let’s start learning some tips that will help you get the perfect light when capturing some food photos. You can go through all the tips and experiment which one works well for your case. It’s for sure that, you cannot apply all the tips together and so, you have to choose the appropriate one according to the environment, background, and the food.
-
Use Natural Lights
It is needless to explain how beautiful the natural light is. And when it is about food photography, natural light can provide the best look anyway. To take photos with natural lights, you can set up the place beside the window or on your balcony.
But there’s something you need to remind yourself when to click photos with natural lights. You shouldn’t use any other artificial light when the base light source is the sun. You should avoid any lap light or orange bulbs anyway.
You may also like- Best Lighting For Product Photography.
-
Don’t Use Flash
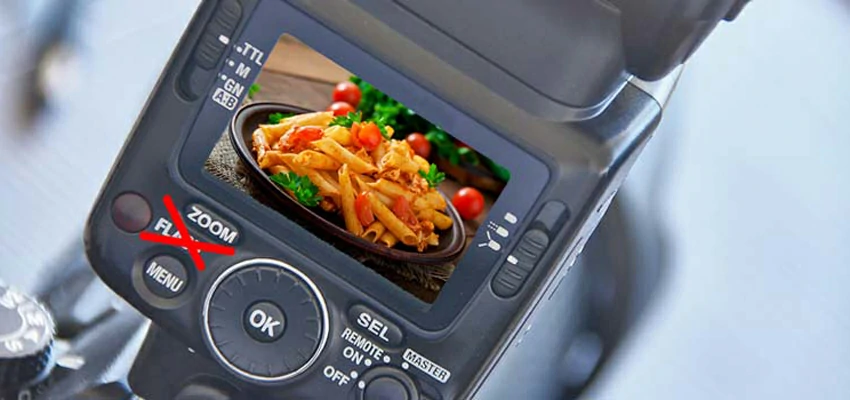
Never ever use the device flash while clicking a photo of food. The terrible highlights it will make can be a disaster. Generally, flash is used only when you are focusing on a single point. But a food photo is a complete photo with even its background. So, keep the flash off and use the additional light for focusing the food plate.
-
Avoiding White Shooting Surface
You should avoid too much white surface while capturing a photo of food. It will help to avoid lots of shadows and give the food a vibrant and clean look.
-
Get A Light Tent

If you are a professional food photographer, you should invest some bucks to have a few gears. A light tent is one of the most essential gears among them. It is like a must-have when you don’t have natural lights and have to click the photo in a dark place.
Clicking photos with natural lights don’t require a light tent. But if your dining space does not get a proper light source, you will need it. Besides, you have to use this light tent to take photos at night.
-
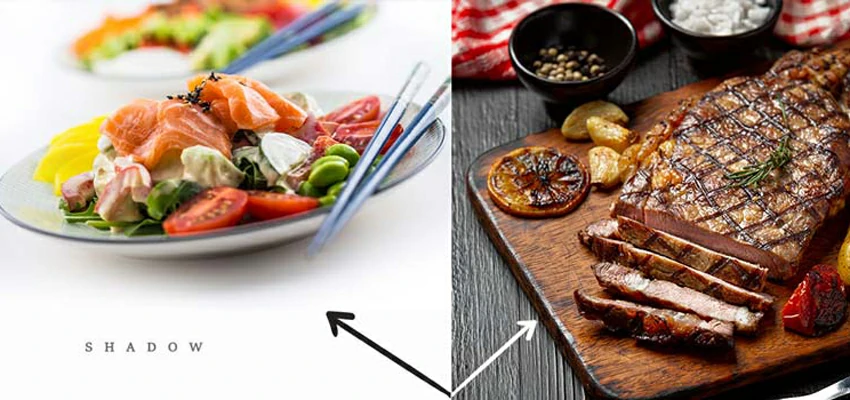
Bounce the Light

When you will set the light in one direction, the food will have a dark shadow. It may not look great in the photo. To avoid the shadow, you cannot simply place another light source on the opposite side. It will make a disaster if the shadows of both side clashes.
What to do in this case? You can simply manage to avoid the shadow by practicing a simple trick. Just bounce the light to move the shadow frequently. And the shadows won’t get their way and then you can click the appropriate one.
-
Diffuse and Filter the Light

Sometimes, you will get an extremely strong explosion of light especially, when you will use the strobe. In that case, defusing the light can help to get a vibrant image.
Again, you can get the light to strongly affect the view still if you need it. In this case, the filter will work very well. You can filter the light by covering it with some paper or cotton fabric. If you want a different color light, you can simply try a different color paper or fabric as well.
-
Soft and Hard Light

While setting the light up, you need to choose whether to use hard light or soft. It is often depending on the background. You need to have a nice contrast between the darkness and light. So, think twice before you choose to have a light or dark light setup.
Besides these essential tips, you should try some other tricks that are not completely about the light setting but anyway related to it. The next section will probably help you with it.
Other Food Photography Tips (Indirectly Related to the Light Setup)
If you are a beginner, we would like to share a few more food photography tips that are somehow related to the light setup. Surely, you will manage to click some aesthetic food photos following the tips.
- You shouldn’t set up the light on different sides at the same time. That means, set the light on only one side. It will provide a clean background. You can also try taking views from different sides and place the light at the appropriate angle.
- Never ever start taking photos of uncooked food. That means you should only click the images when the food is done completely. It’s because there are foods like cheese and chocolate that only come to its perfect look when it is cooked properly. So, the light will work perfectly when it has on its perfect look.
- Use colorful food ingredients will provide a colorful effect on your photos. Then the light setting can make those ingredients like tomatoes, grapes, etc. glossing and fresh.
- You should always take photos from only one angle. And remember that different foods require different angles to take photos from. So, choose the appropriate angle while taking photos.
- Never ever go for oversaturating. Remember that, for colorful food photography, you will need to bump up the saturation level. But an oversaturated effect can ruin the image.
You may also like- Things You Should Avoid For Your Online Product Photo.
Besides, you need to avoid too much negative space while clicking the photos. Additionally, the background is important. You can keep different raw ingredients right beside the plate to give it an aesthetic look.
Wrapping Up
Hopefully, you have learned the way to make the best lighting for food photography. Now, it’s time to expose your masterpiece of tempting and assorted food photos. And let us know if you have anything else to ask about this topic. We’ll try to solve your confusion once you learn about it.
Thank you a million times to stay with us.