May 9, 2022
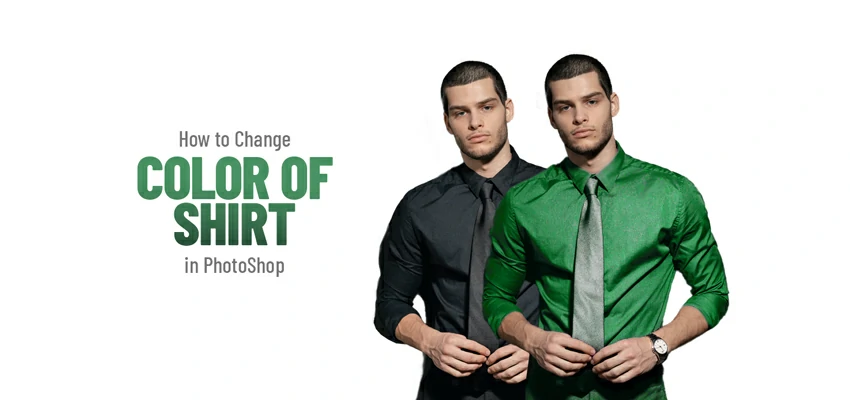
After you’ve successfully found The Perfect Pink Shirt To Purchase, you’ll probably want to know how to change the color of your shirt. While changing the color of a shirt can be a lot of fun, the process can definitely be a little tricky, especially if you’ve never tried it before. There are many tools in Photoshop which enable you to change the color of garments. This kind of tool is very useful when you want to apply your creativity and imagination to create unique fashion designs. This article will show you how to change the color of a shirt
September 7, 2017

More often than not, to remain inventive and stylish, numerous photographers and graphic designers visit many sorts of Graphic Design Inspiration websites. Getting motivation for new design is very simple. Yet, as a bulk design agency for graphic designers & Photographers, we know that it is so hard to discover Inspirations for composing, particularly in the event that you are a Photography or Graphic Design Blogger. Words generally can’t do a thing which a picture can. This is truly valid since history, however an imaginative graphic design blogger knows that it is so difficult to put his plan in words.
January 23, 2013

How to create a Glossy Text Effect in Photoshop Open a new document in Photoshop. Size maintain between 1152 x 864 pixels. Foreground and background will be #5e4a3f and #271509. From the Gradient tool option bar select Linear Gradient Icon. From top to bottom in the canvas drag it. Now add noise through go to Filter to Noise and Add Noise. The amount will be 1 also select the Gaussian distribution. Now write a text on the canvas. With the font of RiotSquad and font color is #c7c7c7 and font size will 365. Copy this text layer. Change the duplicate’s
January 19, 2013

I open Adobe Photoshop in my computer. Create a new document and set its size as width 600 x height 450 pixels. Set color mode in RGB. Where set resolution must be at 72 DPI. Go to Layer then Duplicate Layer and press OK. Follow this step duplicate the background. Save this new layer as your wish, I save it with the name of ‘Background Pattern’. To change the several textures, double click on previous layer named as Background Pattern. By go to ‘Pattern Overlay’ select the ‘Cherry01′ and press OK. Double click on ‘Background Pattern’ to create the vignette
January 17, 2013

To create a Photoshop image we have to open to make an image. So open the Adobe Photoshop. Create a document size with 1200 x 600 and save it as a .PSD file. It will be in RGB mode and 72 Dpi. Open a brick wall texture in the Photoshop. Through transform (Ctrl+T) change the texture and resize as you want. Make it darker by go to levels > Image > Adjustments > Levels or Command/Ctrl+L. The figure is: Make the text with the font “Impact”. Character set by 320pt, (Auto), 80% and 150%. And layer Opacity – 100% with